Do you want to shoot jaw-dropping night photos with your iPhone 11 or iPhone 11 Pro? In the past, iPhone night photography was challenging. But with iPhone 11 it’s easy! The new iPhone Night mode camera feature lets you capture stunning low-light photos with incredible color and detail. Read on to discover how to take unbelievable night photos with iPhone camera Night mode.

Table Of Contents: iPhone Night Mode Camera
Click any title link below to go straight to that section of the article:
1. How Does iPhone Camera Night Mode Capture Such Amazing Night Photos?
2. How To Use Night Mode On iPhone Camera
2.2 How To Take A Stunning Night Mode Photo
2.2 How To Adjust Night Mode Exposure Time
3. Do You Need A Tripod When Using Night Mode?
1. How Does iPhone Camera Night Mode Capture Such Amazing Night Photos?
Whether you’re shooting the last minutes of sunset, a night cityscape, or a candle-lit room, iPhone Night mode produces impressive results.

Night mode is available in the Camera app on iPhone 11, iPhone 11 Pro, and iPhone 11 Pro Max.

On earlier iPhones (and indeed, many digital cameras), night photography is difficult. Blurry photos, excessive grain, exposure problems, and unnatural colors are common issues.
But the new iPhone 11 cameras use intelligent software to eliminate these problems.

When you shoot with Night mode, the camera takes multiple shots over several seconds. It then automatically blends these images into a single high-quality photo.

The camera software aligns the images to correct for any movement. It discards areas with too much blur, using the sharpest parts of each shot.
The exposure is balanced, keeping detail in the shadows without over-exposing the bright areas. Colors are fine-tuned so they look natural and vibrant. And the image is de-noised to reduce grain.
The result is a beautiful night photo with more detail, less grain, and gorgeous colors!

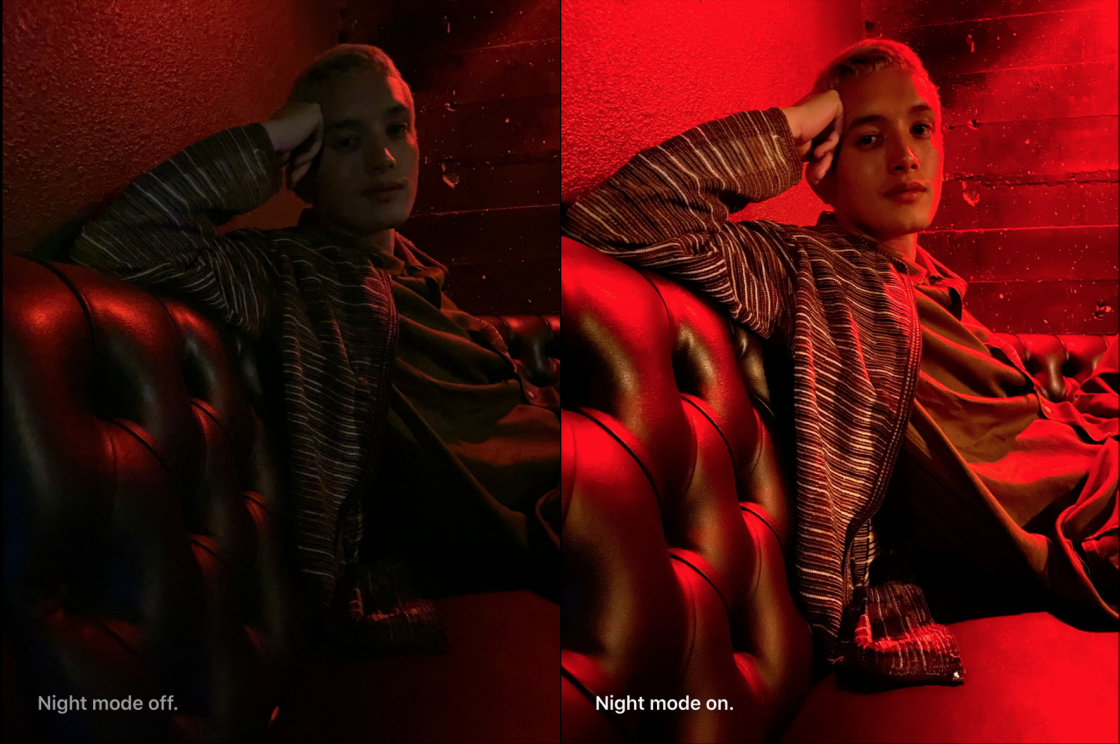
The above (unedited) photo was actually shot at night, with only a couple of streetlamps illuminating the scene.
For comparison, below is the same scene captured with Night mode turned off. The image is darker, duller, and more grainy.

2. How To Use Night Mode On iPhone Camera
The Night mode iPhone camera feature might sound complicated. But shooting with Night mode is very easy!
In fact, Night mode comes on automatically whenever the iPhone detects you’re shooting in low light.

2.1 How To Take A Stunning Night Mode Photo
Firstly, ensure you’re shooting with either the 1x Wide lens or the 2x Telephoto lens (only available on iPhone 11 Pro). Night mode doesn’t work with the 0.5x Ultra Wide lens.

You also need some kind of light in the scene. You could use a lamp, a candle, street lights, illuminated windows, or even bright moonlight.
You won’t get good results if the scene is totally dark.
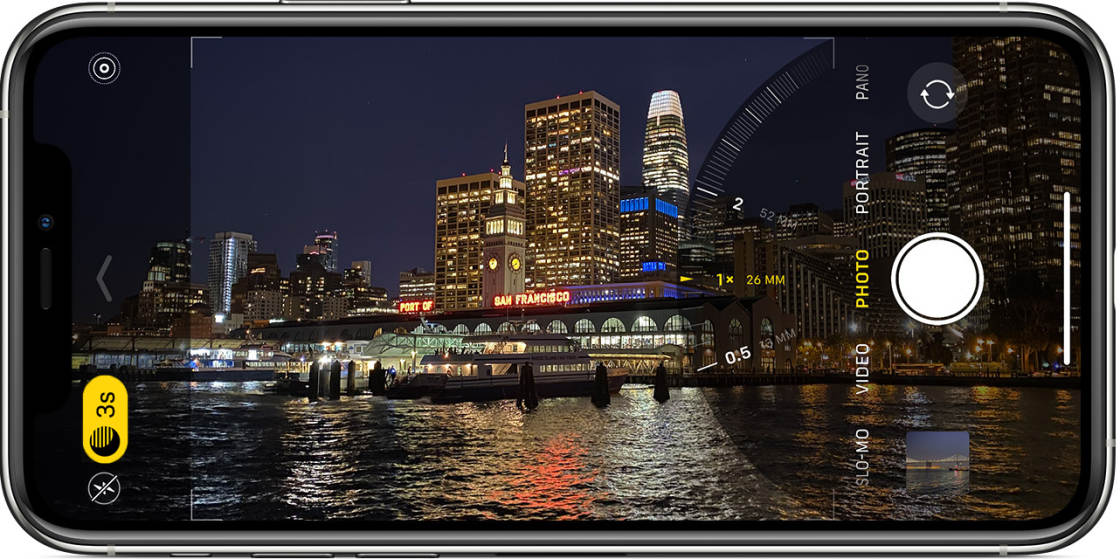
The Night mode (moon) icon appears at the top of the screen whenever you shoot in low light.

If the icon is white, the iPhone is suggesting you could use Night mode to improve your shot. But it’s not actually switched on at this point.
To activate Night mode, tap the white Night mode icon so it turns yellow.

When you’re shooting darker scenes, Night mode automatically switches on. The Night mode icon appears yellow when it’s active.
The number on the Night mode icon indicates how long it will take to capture the photo, e.g., 1 second, 3 seconds, etc.
When you take your shot, the yellow slider above the shutter button displays a timer. It counts down the seconds to the end of the exposure.

Hold your iPhone still until the shot is complete. Remember, the camera is taking multiple pictures during the exposure time. The steadier you hold your camera, the sharper your photo will be.
As soon as the exposure is finished, your iPhone blends the images together to create your Night mode photo.

For comparison, below is the same candlelit scene captured without Night mode. The image is much darker, with less detail and color.

2.2 How To Adjust Night Mode Exposure Time
When you shoot a Night mode photo, the camera sets the exposure time automatically.

In general, the darker the scene, the longer the exposure time will be. A longer exposure allows the camera to capture more light.
Exposure time is also dependent on how still you hold the camera.
If your hands are a bit shaky, the exposure time will be quite fast, e.g. 1 second. A fast exposure time helps eliminate the chances of a blurry photo.
If you hold the camera really steady, the camera is likely to use a longer exposure time.

But you don’t have to accept the automatic exposure time that your iPhone sets. If you wish, you can increase the exposure time to the maximum time available.
To adjust exposure time, drag the Exposure Time slider above the shutter button. (If you can’t see the slider, tap the yellow Night mode icon at the top of the screen.)

The slider has an Auto setting which is the exposure time recommended by your iPhone.
Drag the slider right to increase the exposure time to the Max setting.

The maximum exposure time will vary depending on the light conditions and how still you’re holding the camera.
To switch off Night mode, drag the slider all the way to the left to the Off setting.

7 Hidden iPhone Camera Features
As it turns out, the most important iPhone camera features are completely hidden from regular iPhone users. That's why we created this free video revealing 7 hidden iPhone camera features that every photographer should use. Click here to watch this video.

3. Do You Need A Tripod When Using iPhone Night Mode?
Long exposure photography normally requires a tripod to keep the camera steady.
But with the iPhone Night mode camera feature, you don’t necessarily need a tripod.

The iPhone’s optical image stabilization steadies the lens to reduce blur. And during the image blending process, the multiple shots are aligned to correct for any movement.
This means you can hand-hold your iPhone when shooting with Night mode.
However, you do need to hold your phone as still as possible. If it’s shaking too much, your photo won’t be sharp.

Of course, if you have an iPhone tripod it’s definitely worth using it to get the sharpest possible shot.
Another benefit of using a tripod is that your iPhone can use longer exposure times. And this allows the camera to capture more light and detail.
When you mount your iPhone on a tripod, the phone detects that it’s being held completely still. The camera knows it’s safe to use longer exposure times because there won’t be any camera shake.

So, an iPhone tripod isn’t essential when using Night mode. But it’s certainly a good idea to use one when possible.
A tripod will ensure you get sharp, detailed night photos every time you press the shutter.
The post How To Use iPhone Night Mode Camera On iPhone 11 & 11 Pro appeared first on iPhone Photography School.
from iPhone Photography School https://ift.tt/2nm8cjp
via
IFTTT